Guide: How to Jailbreak iPhone 5 and all iOS 6 Devices
Evasi0n is the program to run the Untethered Jailbreak on all iOS devices 6. It was released a few Hours. Here is the step by step guide to perform the entire process of the jailbreak on your devices.
Compatible Devices
- iPhone 3GS
- iPhone 4
- iPhone 4S
- iPhone 5
- iPad mini
- iPad 2
- iPad 3
- iPad 4
- iPad 5
- iPod touch 4th generation
- iPod touch 5th generation
- Apple TV second generation (to be tested)
Firmware compatible
It is highly recommended to upgrade to iOS 6 “complete” or through iTunes. For more information on this, we refer to our article: How to prepare for Jailbreak .To check your version, go to the device in Settings , General , About , Version
- iOS 6.0
- iOS 6.0.1
- iOS 6.0.2
- iOS 6.1
Necessary
- A computer with Windows XP or later, or Mac OS X 10.5 or later, or Linux x86 / x86_64
- A device compatible with compatible firmware
- A USB cable to connect the device to your computer
- Evasi0n software for your computer >> DOWNLOAD <<
- firmware of your device >> iPhone , iPad, iPod
- iTunes [optional. see the final recommendations]
- 5 minutes of time to perform the procedure and the time necessary to perform backup and restore
Procedure
The hacker group @ evad3rs have done a great job and made the process very user friendly, but sometimes if you want to be safe, or nearly so, not to find errors or if you have already found errors, we recommend you follow our step by step guide.
If you are not skilled enough or you want to avoid problems it is best to jailbreak a device reset as new (see tips finals). Also valued the opportunity to wait for the first results and any minor updates to the tool. In summary, the main steps including preparation and configuration are:
- Backup and Synchronization (recommended)
- restore as new and initial configuration of the device (recommended)
- Jailbreak
- possible to restore from backup and synchronization (not recommended)
Here is the step by step guide to run the jailbreak on iOS devices via evasi0n 6:
1. Make sure you have closed iTunes and Xcode and NOT avviamoli during the whole process! Better to close all programs and leave only this guide
2. We disable the access code to the iPhone, in the case in which it was active. May cause problems
3. Unload evasi0n for your operating system ( HERE ), extract the archive and we start the tool by clicking the icon “evasi0n”
Note: on Windows you have to click with the right mouse button on the application icon and from the drop-down menu select “Open as administrator”.
5. We connect our device with iOS 6 (see requirements), active and without access code, and wait for the acknowledgment
6. Click on the button “Jailbreak”

7. Expect the procedure without touching the device and do not open programs on your computer.
Note: we can see the phase in which packages are uploaded to Cydia
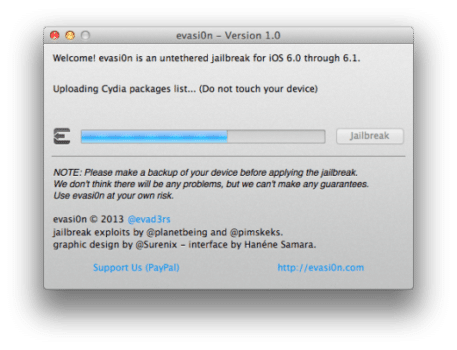
8. After a few minutes, the device will reboot. We expect that the program will show the message “To continue, please unlock …” and just take the device and we unlock, we will be in Home
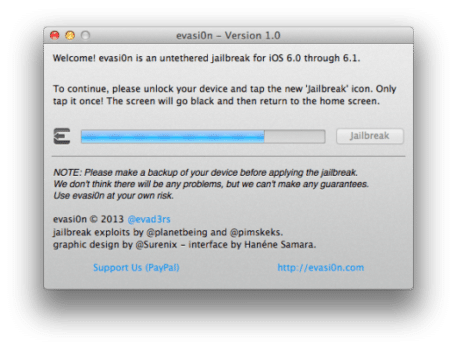
9. We find a new icon on the Home “Jailbreak”, Press it A once and wait for the completion of the Jailbreak
IMPORTANT: Pressing the icon will give the impression that an app has been opened and closed immediately, even if instinctively want to open it again, DO NOT DO IT, press it once

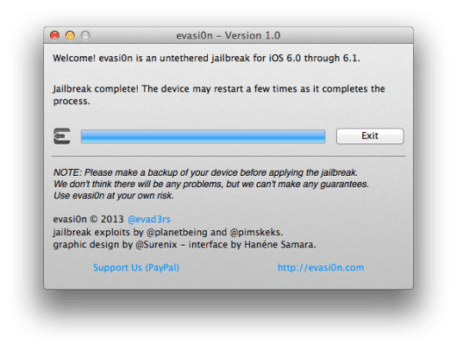
10. When the process is complete, the computer will show the “Exit” button. At this point the procedure will be completed on the device.
11. On the iPhone will take a series of screens with logo evasi0n, we are waiting for without touching the device. Will take a series of animations.
NOTE: This phase lasts up to 5 minutes (on restored as a new iPhone before the jailbreak), if after 10 minutes the device is locked on this screen do a forced reboot by pressing the Home button for 10 seconds and the Power button. After the reboot you will find the Cydia icon, otherwise reset and run the procedure.
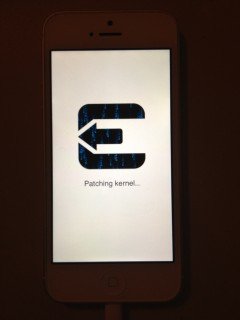
12. At the end of the process, the device will find the Cydia icon
13. Open Cydia, it will run the initial configuration, the device will restart and then we will be ready to use
Since evasi0n also includes the Cydia packages, this stage will last very little when compared with the past
14. Congratulations you have a Jailbroken device! Use it well!
From when I clicked on “Jailbreak” to load Cydia packages the procedure lasted less than 10 minutes, this on an iPhone that has been restored before the Jailbreak.
Advice
If you want to be sure to be able to perform the procedure the first time, we recommend that you follow all these tips you find below. If you have found mistakes, re-read all our tips and run guide again from the beginning.
Before backing up!
The very first step to be performed in these cases, after being well informed and have read the entire manual, is to save all of our data and remember that a backup in more never hurts, then:
- Perform the backup manually via iTunes by connecting the device to our computer via the USB cable and selecting “make up now.” The backup is created as one of iCloud, which does not contain the installation files of the applications, so if you want to re-download, synchronization is necessary
- We perform the synchronization so as to pass on the computer all applications and not having to re-install them one by one in case of recovery
- We also recommend that you enable iCloud for always quickly available: contacts, email, calendars, reminders, Safari bookmarks, notes, Passbook, streaming photos and “Documents and Data” of APP and share them directly on icloud (as Pages, Numbers, etc..)
Restore before jailbreak
To make the process of jailbreak as quick as possible and to avoid problems that can occur during the procedure so the Jailbreak, the next use of the device jailbroken, you should perform a hard reset of the device. Recovery before the jailbreak is highly recommended, even considered mandatory in these cases:
- if you have upgraded directly from the iOS device (not from iTunes)
- if the device was jailbroken and have not restored before updating
- if the device has iOS 6 with tethered Jailbreak
To restore the device “as new”
- Connect your device to your computer, preferably in DFU mode
- Click “Restore iPhone …”
If you have already downloaded the file ” ipsw “iOS 6.1 >>, you can prevent iTunes download it again, then click on “Restore iPhone …” and simultaneously press the Shift key on the keyboard, Windows, or “Alt” , Mac, and select the file ” ipsw “.
- Perform the initial configuration of the device , so as to make it operational, and when it asks you how to configure select “As a new iPhone”
Restore the backup after jailbreak?
In principle, we have two choices:
- Restore your device as new and do not reload the bakcup . This means giving up the photos into the rollers (and then save them on your computer), the historian of messages and more generally, content and rescue applications that do not store their “Documents and Data” on iCloud or that are not synchronized via Facebook or other systems.
- Restore your device as new and restore the backup after jailbreak, which means that the device will find the situation before the Jailbreak
Theoretically, there is also a third possibility, that is, run the jailbreak on the device without reset, but this procedure has always been discouraged by all the hackers and from experience I can say that can lead to delays during both the Jailbreak in both the operation of the device, so avoid .
In the event that this is the first jailbreak the device, or the first after restoring as new, you can choose both ways, but we recommend first to avoid problems.You can also try to restore the backup and restore everything in case of problems.
In the case where the device on which we want to run the Jailbreak via evasi0n, is a device which is already present on the Jailbreak or a device on which the Jailbreak was present before updating to iOS 6, it is mandatory to choose the first road, namely the total recovery without restore the backup , to avoid running into problems when using and not lose storage space on your device.
For more detailed information we refer to our article: How to prepare for Jailbreak
If I have a jailbroken device?
As already suggested, it is preferable to perform a master reset for iOS 6 and delete the entire contents of your device and restore the backup (even if you recommend it, because it can always be useful). Before you can restore:
- save photos to your computer, which you can then insert the device via the iTunes sync
- save the chronology of messages if we want to restore
- save the contents of the application via iTunes
In particular, thanks to PKGBackup , a tweak present in Cydia, you can save all the data on your iDevice (excluding App) as: repository, tweak, text messages, notes, photos, videos and more. Through the same PKGBackup can then restore all of this content, or just a few if you want, on the device.
If you have a device with iOS 6 and Jailbreak Tetether you can also download the package from Cydia to evasi0n that makes JB Untethered
If you have any questions or problems you have encountered, carefully re-read the guide, check in the comments if someone has already encountered the same problem. To report problems, leave comments and post feedback, feel free to use our site through which you can receive answers to all your questions.
Evasi0n was developed by the team evad3rs composed pimskeks, planetbeing , pod2g and MuscleNerd , who officially thank:
- @ Phoenixdev for his research
- @ Surenix for the design of evad3rs and evasi0n
- Hanene Samara for his work with the GUI evasi0n
- @ @ Iphone_dev chronicdevteam and for their support
- Kiki the cat for inspiration
Stay tuned! The guide will be updated with the video of our first Jailbreak and from time to time will be added suggestions and resolutions to common problems.
Shortlink:


Recent Comments